
- Introduction
- Installing CircuitPython
- My CircuitPython Code
- Download code, image and audio files
- Program instructions
- 3D printed case
Introduction
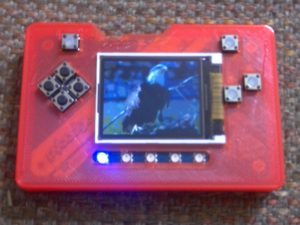
After seeing this new Adafruit product on Instagram (@adafruit, @ecken, and @videopixil) I was very anxious to get my hands on an Adafruit PyBadge, part handheld game console, part micro-controller board. It has a 1.8 inch 160×128 pixel built-in color display, video game-style buttons, built-in sound, neopixels for bling, file storage for game assets, an accelerometer, an ambient light sensor, and a speedy ATSAMD51 processor. I was excited to run it through its paces. First, I learned how to update its bootloader, Next, I tried out an example MakeCode project. After that, I gathered a board definition and the libraries that are necessary to write code for it using the Arduino development environment. I needed to make sure that the Adafruit board definition URL was included in the Additional Boards Manager URLs in the Arduino preferences. After going through the manual process of adding libraries for the PyBadge, I finally got the example code, arcada_pybadge_test running. The example code, demonstrating the Arcada Library, was almost all text, so it wasn’t very exciting.
Installing CircuitPython
Since Adafruit seems to be touting the powers of CircuitPython, I wanted to see what all of the hoopla was about. My previous Python experience had been with Raspberry Pis. As you can tell from my introduction, finding all of the software is very much like a scavenger hunt. I had to download CircuitPython for the PyBadge from CircuitPython.org and install it onto the PyBadge. I had to download the latest release of the Adafruit CircuitPython Bundle (libraries) from GitHub. For a text editor, Adafruit suggests using the simple Mu editor, which I also installed. It simplifies iterative development, since changes are automatically saved to the PyBadge.
My CircuitPython code
Now that the scavenger hunt for all of the software is complete, on to the code… The code below is basically composed of example snippets that I gathered to do the things that I wanted to learn how to do: sound, text, images, buttons, neopixels, accelerometer, and ambient light sensor. To run this code, you will need my 160×128 8-bit .bmp format images (0.bmp – 10.bmp) in an /images folder, a sound file (tink.wav), a bitmap font (Arial-12.bdf) in a /fonts folder, and additional libraries placed in the /lib folder:
- neopixel
- adafruit_bitmap_font
- adafruit_busdevice
- adafruit_display_text
- adafruit_imageload
- adafruit_lis3dh
Download code, image and audio files
Download the CircuitPython code, images and audio
#
# This is a CircuitPython example file for the Adafruit PyBadge
# Lucina 2019-06-06
#
# -- play sounds
# -- set display brightness
# -- fill screen
# -- write text
# -- load and display an image
# -- turn on, set brightness of neopixels
# -- read buttons
# -- read accelerometer
# -- read ambient light sensor
#
import analogio
#import array
import audioio
import board
import busio
import digitalio
import displayio
import math
import neopixel
import time
import neopixel
import adafruit_imageload
from adafruit_bitmap_font import bitmap_font
from adafruit_display_text.label import Label
import adafruit_lis3dh  # accelerometer
from gamepadshift import GamePadShift

# Button Constants
BUTTON_LEFT = 128
BUTTON_UP = 64
BUTTON_DOWN = 32
BUTTON_RIGHT = 16
BUTTON_SEL = 8
BUTTON_START = 4
BUTTON_A = 2
BUTTON_B = 1

NUM_IMAGES = 11
BKG_COLOR = 0xCC44FF
MY_NAME = "@lucina__m"
NAME_FONTNAME = "fonts/Arial-12.bdf"
NAME_COLOR = 0xFFFFFF
NUM_NEOPIXELS = 5
NEO_COLOR = 0x000088
NEO_BRIGHTNESS = .1
BACKLIGHT = .9

whichNeo = 0
neoBrightness = NEO_BRIGHTNESS
brightness = BACKLIGHT

def fadeIn():
    for b in range(20, brightness*100, 1):
        board.DISPLAY.brightness = b/100   # 0.0 --> 1.0
        time.sleep(.02)

def fadeOut():
    for b in range(brightness*100, 20, -1):
        board.DISPLAY.brightness = b/100   # 0.0 --> 1.0
        time.sleep(.02)

def loadImage(index):
    # load image into bitmap and palette
    #message("loading...")
    fadeOut()
    (bitmap, palette) = adafruit_imageload.load("images/"+str(index)+".bmp",
                       bitmap=displayio.Bitmap,
                       palette=displayio.Palette)
    # create sprite
    sprite = displayio.TileGrid(bitmap,
                               pixel_shader=palette,
                               x=0, y=0)
    # remove loading message
    #group.pop()
    # remove previous layer
    group.pop()
    # add new layer
    group.append(sprite)
    updateNeopixels()
    fadeIn()

def updateNeopixels():
    global whichNeo
    global neoBrightness
    for n in range(0, NUM_NEOPIXELS):
        if n == whichNeo:
            neopixels[n] = NEO_COLOR
        else:
            neopixels[n] = 0
    neopixels.brightness = neoBrightness
    neopixels.show()
    if whichNeo == NUM_NEOPIXELS-1:
        whichNeo = 0
    else:
        whichNeo = whichNeo + 1
    print(neoBrightness)

def message(text):
    label = Label(nameFont, text=text)
    label.color = NAME_COLOR
    (x, y, w, h) = label.bounding_box
    label.x = (80 - w // 2)
    label.y = (64 - h // 2)
    group.append(label)

def splashScreen(color):
    splashBitmap = displayio.Bitmap(160, 128, 1)
    splashPalette = displayio.Palette(1)
    splashPalette[0] = color
    splashSprite = displayio.TileGrid(splashBitmap,
                               pixel_shader=splashPalette,
                               x=0, y=0)
    group.append(splashSprite)

# make the image display
group = displayio.Group(max_size=10)
board.DISPLAY.show(group)
board.DISPLAY.brightness = BACKLIGHT   # 0.0 --> 1.0

# make a splash screen background
splashScreen(BKG_COLOR)

# display my name while image loads
nameFont = bitmap_font.load_font(NAME_FONTNAME)
message(MY_NAME)

# required for PyBadge audio
speakerEnable = digitalio.DigitalInOut(board.SPEAKER_ENABLE)
speakerEnable.switch_to_output(value=True)
dac = audioio.AudioOut(board.SPEAKER)

# Generate one period of sine wave
#length = 8000 // 440
#sineWave = array.array("H", [0] * length)
#for i in range(length):
#    sineWave[i] = int(math.sin(math.pi * 2 * i / 18) * (2 ** 15) + 2 ** 15)

# audio output
#rawSine = audioio.RawSample(sineWave, sample_rate=8000)
#dac.play(rawSine, loop=True)
#time.sleep(1)
#dac.stop()
#rawSine.deinit()

# play wav file
data = open("tink.wav", "rb")
wav = audioio.WaveFile(data)
dac.play(wav)
while dac.playing:
    pass
wav.deinit()
dac.deinit()

# prepare for neopixels
neopixels = neopixel.NeoPixel(board.NEOPIXEL, NUM_NEOPIXELS,
                            brightness=NEO_BRIGHTNESS, auto_write=False,
                            pixel_order=neopixel.GRB)
for n in range(0, NUM_NEOPIXELS):
    neopixels[n] = 0
neopixels.show()

# prepare for gamepad buttons
pad = GamePadShift(digitalio.DigitalInOut(board.BUTTON_CLOCK),
                   digitalio.DigitalInOut(board.BUTTON_OUT),
                   digitalio.DigitalInOut(board.BUTTON_LATCH))

# prepare accelerometer
i2c = busio.I2C(board.SCL, board.SDA)
int1 = digitalio.DigitalInOut(board.ACCELEROMETER_INTERRUPT)  # Set this to the correct pin for the interrupt!
lis3dh = adafruit_lis3dh.LIS3DH_I2C(i2c, int1=int1)

# prepare light sensor
light = analogio.AnalogIn(board.LIGHT)  # dinit() when done

group.pop()     # remove name
index = 0
loadImage(index)

# main loop
current_buttons = pad.get_pressed()
last_read = 0
speed = 5

while True:
    # Reading buttons too fast returns 0
    if (last_read + 0.1) < time.monotonic():
        buttons = pad.get_pressed()
        last_read = time.monotonic()
    if current_buttons != buttons:
        # Respond to the buttons
        if (buttons & BUTTON_RIGHT) > 0:
            if index < NUM_IMAGES-1:
                index = index + 1
            else:
                index = 0;
            loadImage(index)
        elif (buttons & BUTTON_LEFT) > 0:
            if index > 0:
                index = index - 1
            else:
                index = NUM_IMAGES - 1;
            loadImage(index)
        elif (buttons & BUTTON_UP) > 0 and brightness < .9:
            brightness += .1
            board.DISPLAY.brightness = brightness   # 0.0 --> 1.0
        elif (buttons & BUTTON_DOWN) > 0 and brightness > .1 :
            brightness -= .1
            board.DISPLAY.brightness = brightness   # 0.0 --> 1.0
        elif (buttons & BUTTON_A) > 0 and neoBrightness < 0.5:
            neoBrightness += 0.05
            updateNeopixels()
        elif (buttons & BUTTON_B) > 0 and neoBrightness > 0.05:
            neoBrightness -= 0.05
            updateNeopixels()
        elif (buttons & BUTTON_SEL) == BUTTON_SEL:
            pass
        elif (buttons & BUTTON_START) == BUTTON_START:
            pass
    current_buttons = buttons
    # accelerometer
    x, y, z = lis3dh.acceleration
    print(x, y, z)
    if lis3dh.shake(shake_threshold=15):
        print("Shaken!")
    # light sensor
    print(light.value)
Program instructions
- up, down buttons: change the screen brightness
- left, right buttons: change the image (this may crash because of memory allocation errors)
- a, b buttons: change neopixel brightness, change which neopixel is lit
To customize the code, you can create your own 8-bit (256) 160×128 pixel images. I used Windows 10 Paint to convert .jpg files. Name the images by number, starting with 0.bmp. Set the image count using the constant NUM_IMAGES. The name displayed on the startup splash screen is defined in the MY_NAME constant. The name of the sound file, tink.wav, is set in the code.
3D printed case
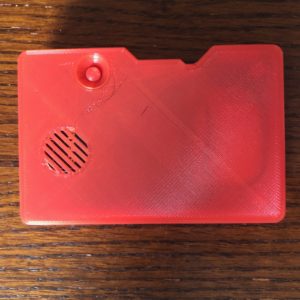
Since I’m a 3D printing aficionado, I’ll bring up the case I’m using. I downloaded a snap-fit case from Thingiverse, and modified the model to include the speaker grill from the screw-together model. You may download the modification.